Among many of my favorite healthy chicken recipes, this quick and healthy meal cooked Chinese-style, stir-fried broccoli with cashews is delicious served with hot steamed rice or noodles. In this chicken recipe, skinless and boneless chicken breasts are cut into chunks and marinated in a sweet, tangy and salty mixture of sugar, garlic and soy sauce and then stir-fried in hot oil. The dish is combined with red bell peppers, broccoli, and onions and seasoned with chicken broth thickened with cornstarch. The dish is garnished with cashews to add a nutty flavor and crunch. The stir-frying method allows the chicken chunks to retain its shape even after cooking on medium-high heat for a beautiful presentation. The broccoli and red bell peppers also provide a pleasant color contrast for a lively and vibrant meal.
Ingredients
1 tsp. sugar
2 tbsp. low-sodium soy sauce
3 med. cloves garlic, minced
2 boneless, skinless chicken breasts, cut into chunks
3/4 cup low-sodium chicken broth
4 tsp. cornstarch
2 tbsp. + 1 tbsp. peanut oil
1 red bell pepper, cut into strips
4 cup broccoli pieces
1 med. onion, chopped
1 cup cashew halves
Preparation Instructions
In a mixing bowl, combine sugar, soy sauce and garlic. Add chicken chunks. Stir to coat thoroughly. Set aside.
In another bowl, combine chicken broth with cornstarch, whisking until there are no lumps. Set aside.
Heat 2 tbsp. peanut oil in a wok over medium-high heat. Add chicken chunks; stir-fry 4-5 minutes.
Add remaining oil, pepper and broccoli. Stir-fry for about 3 more minutes.
Add onion; stir-fry an additional 2-3 more minutes, or until chicken is fully cooked and vegetables are crisp-tender.
Stir in cornstarch mixture, stirring constantly until mixture thickens, 1-2 minutes. Remove from heat. Add cashews and serve with rice or lo mien noodles.
Having a bit of trouble in making a new dish out of that leftover chicken from the previous meal? Trouble yourself no more! This cooking recipe will knock you off your feet (not literally but you know what I mean.) This tasty chicken recipe is easy to prepare and tastes absolutely amazing. If you don’t have leftover chicken and are using fresh raw chicken, there are a number of ways you can cook the meat for use in this recipe. One of the fastest ways to cook the chicken is to first slice them into cubes and then sauté them in a bit of olive oil.
Ingredients
6 6-inch corn tortillas
2 cups cubed cooked chicken
1 cup frozen whole kernel corn
1 jar (16 oz) salsa
3 tbsp. fat-free sour cream
3 tbsp. chopped fresh cilantro
1 tbsp. flour
2 cup (8 oz.) shredded Mexican cheese blend
Preparation Instructions
Preheat oven to 350 degrees. Cut tortillas into wedges, six wedges for each one.
Lightly coat a large casserole dish with cooking spray or olive oil. Place half of the tortilla wedges in the bottom of the dish.
Place the other half on a baking sheet. Put baking sheet in oven and bake until tortillas are crisp and golden, about 10 minutes.
While tortillas are baking, mix chicken, corn, salsa, sour cream, cilantro and flour. Pour mixture over top of tortillas in baking dish.
When the plain tortillas are finished, remove from oven and set aside. Place baking dish in oven and cook, uncovered, for 20 minutes. Remove from oven.
Arrange baked tortillas wedges on top of casserole. Top with cheese. Bake until heated through, 5-10 minutes. Garnish with extra sour cream, fresh peppers, fresh cilantro and chopped tomato, if desired.
Although it may seem simple, but fried chicken is a bit hard to cook - that I have to admit. I had to undergo alot of fails before I get to cook it perfectly. Cooking recipes such as this may seem easy but in reality, it's complicated than that. And there are alot of types of chicken recipe for fried chicken.
A few pieces of chicken Buttermilk 1 cup of flour 2 teaspoons of Pepper 1 tablespoon of Salt
Preparation Instructions
1. Soak the chicken in buttermilk for a couple of hours. 2. Mix the flour, pepper and salt together. Dredge the chicken through the flour mixture and get it coated all the way around. 3. Heat oil to about 300 degrees and drop the chicken in very carefully. Let the chicken cook for a couple of minutes. The inside temperature should be 180 degrees. Here is a bonus content: a video tutorial on how to fry chicken perfectly. I hope this helps!
Breakfast cooking recipes are quite famous. But it's hard to get up early in the morning to prepare a breakfast meal especially now that it's really cold in the morning and all we wanna do is stay in our warm, cozy bed. So as much as possible, what we want are easy cooking recipes. That is why I thank the universe for providing us with culinary geniuses who are sharing quinoa recipes. Quinoa recipes are easy to do, cooked to perfection in a matter of minutes, and are noted to be healthy recipes. *giggles in glee* I really love quinoa.
Some people prefer to cook quinoa like how they cook and serve oatmeal. A nutritious meal that will keep you energized for the whole day. While some cook quinoa and just add fresh fruits to it, and voila, a simple breakfast recipe that is nutritious and healthy. Quinoa is an amazingly nutritious little grain that is well loved by people especially those who are living a healthy lifestyle.
It's your choice, really, to play with quinoa. In any ways, quinoa is a great easy recipe that you can prepare with other ingredients.
Insalata Caprese (salad in the style of Capri) is a simple salad, made of sliced fresh mozzarella, tomatoes and basil, seasoned with salt, and olive oil.In Italy, unlike most salads, it is usually served as an antipasto (starter), not a contorno (side dish).
If you want your caprese to have a little bit on the side, then this chicken recipe, Caprese Chicken Breast, is a must-try. This dish will prove you that healthy chicken recipes are great tasting. Ingredients:
1 T extra-virgin olive oil
2 thinly-sliced chicken breasts, lightly pounded
3 cloves garlic, minced
freshly-ground pepper & kosher salt
crushed red pepper flakes
1/4 c fresh lemon juice
3 T chopped basil or oregano
2 Roma tomatoes, sliced
4 oz fresh buffalo mozzarella
Preparation Instructions:
Heat olive oil in pan.
Place chicken on heated pan.
Add garlic, salt & pepper, and red pepper flakes. Sear on both sides.
Add lemon juice and basil or oregano.
Layer tomatoes and mozzarella on chicken.
Top with extra herbs
Transfer to oven and bake at 425 for 5-10 mins until cheese is melted.
To help you further with this recipe, you can watch this video where Chef Amy Riolo demonstrates how to make caprese style chicken breasts with a mixed pepper medley.
Quinoa recipes are really easy to prepare and cook not to mention that it's easy to match with any, at all, recipes.
Cooking recipes such as Mediterranean Quinoa Salad, is best paired with with spices like coriander, cumin, paprika, cinnamon, feta, olive oil, parsley, lemon, and mint and makes a very nutritious salad.
Ingredients:
2 cups chicken stocks 2 cups water 1 cup uncooked quinoa, rinsed and drained 1 clove garlic, crushed 2 chicken breast – cooked and sliced into bite sizes 1 large red bell pepper, chopped finely 1 large green bell pepper, chopped finely ½ cup kalamata olives, chopped 1 large red onion, chopped ¼ cup fresh parsley, chopped ½ cup crumbled feta cheese ¼ cup fresh chives, chopped ½ cup fresh lemon juice ¼ cup olive oil 1 tablespoon balsamic vinegar Salt to taste
Preparation Instructions:
Combine water, chicken stock and garlic in saucepan and bring to a boil. Once boiling, add quinoa, cover and cook at medium-low heat, about 15-20 minutes or until quinoa is tender and has absorbed the water. When cooked, remove the garlic, scrape and transfer quinoa in a large salad bowl.
Stir in cooked chicken slices, red and green bell peppers, olives, onion, crumbled feta cheese, parsley and chives. Sprinkle fresh lemon juice, olive oil and balsamic vinegar. Toss lightly until all ingredients are evenly mixed. Sprinkle shredded feta cheese on top and serve or refrigerate and serve cold.
Another one of those cooking recipes that is very easy to do, well-suited for the rush weekdays and lazy weekends, not to mention a chicken recipe that will lift your spirits up, Baked Chicken Noodle Casserole is, perhaps, a member of the healthy chicken recipes that is sent from heaven. If you're feeling a bit tired from your work, your relationship, your busy schedule and want to relax and take it easy, this is the perfect recipe for you. It's easy since you just throw in all the ingredients you need and wait for it to cook until it's nice and bubbly.
Ingredients:
6 oz. whole grain egg noodles
6 tbsp. olive oil
8 oz. (1 can) sliced mushrooms, rinsed and drained
6 tbsp. flour
1 2/3 cup fat-free chicken broth
1 cup skim milk
Salt to taste
1/2 tsp. coarse ground black pepper
1 cups chicken tenderloin, cooked and diced
1 cup frozen peas
1/2 cup low-fat grated Parmesan cheese
Instructions:
Preheat oven to 350 degrees. Lightly grease a 2 1/2 – 3 qt. baking dish.
Cook noodles according to package directions. Drain.
While noodles are cooking, heat olive oil over low heat in a large skillet. Add mushrooms and sauté until tender.
Blend in flour and stir until mixture is smooth and bubbly.
Slowly add chicken broth, milk, salt and pepper, stirring constantly until thickened. Stir in chicken, peas and cheese. Add noodles.
Spoon mixture into baking dish. Sprinkle extra cheese over top, if desired. Bake uncovered 20 to 25 minutes, or until hot and bubbly.
Among many cooking recipes, perhaps, quinoa recipes are known to be one of the healthiest. Quinoa is slowly making its way up to the top as one of the most used and flexible ingredient that you can find in a kitchen. Not too shabby, right? Well, most people who discovered the healthy benefits of quinoa are substituting it to rice. Like in this certain recipe, unlike the normal rice pudding, we will, today, make a quinoa pudding.
Quinoa is also packed with nutrients and rich in protein so it is perfect for those who are in a low-carbohydrate diet. The flavor of quinoa is like brown rice, a bit nutty, but with a texture like oatmeal, soft and fluffy. This makes it perfect for making pudding. I assure you that this recipe will only take about 40 minutes of your time or less. It's a healthy recipe that one must know. Ingredients:
¾ cup quinoa, rinsed and drained
1 ½ cups water
2 cups milk
¼ cup brown sugar
2 medium ripe bananas
Salt to taste
½ teaspoon butter
½ teaspoon vanilla extract
Procedure:
In a saucepan, combine water and cleaned quinoa. Boil over high heat, stirring occasionally. Once boiling, reduce heat to medium low, cover saucepan and continue simmering about 15 minutes. Remove from heat and set aside.
Combine together the milk, brown sugar, bananas and salt, blend using a blender or a food processor until smooth. Then pour in milk mixture in the saucepan with quinoa.
Put saucepan back over medium heat. Continue cooking, 5-15 minutes or until mixture thickens and becomes creamy, stirring occasionally. When done, remove from heat, blend in butter and vanilla extract. Serve warm.
Today, we will be uncovering this amazing salmon and chicken recipe (with salmon). Do know that this certain recipe requires: (1) marinade; (2) cutting and skewering the salmon and chicken; and (3) grilling.
For this certain recipe, I will discuss it in parts. ------------------------------------------------------------------------------------------------------
MARINADE
Ingredients/Utensils
Cutting board
Sharp knife
Grill
Chicken
Salmon
Sesame oil
soy sauce
Lemon juice
rice wine vinegar
garlic
olive oil
salt
cilantro
Preparation Instructions
Go over to the marinade bowl.
Put 2 tablespoons of Soy sauce and lemon juice, and then 1 tablespoon of rice wine vinegar.
Take the olive oil and drizzle it into the base, whisking the mix as you do.
Take the tip off of the garlic and then finely chop it. Then add salt to it.
Mash the garlic down with your knife.
Put the garlic paste into the marinade.
Divide the marinade into two with another bowl.
For Chicken
Go back to the chicken and cut from an angle on the chicken evenly, slightly thick bite size pieces.
Place these slices into the marinade and mix them in.
Take a little cilantro and pull it into pieces on top of the chicken.
For Salmon
Take the belly flap off of the salmon.
Then cut the salmon into a filet shape. This will define its desired length. Then continue cutting it into bit sized pieces.
Put the salmon into the second bowl of marinade and pull apart some cilantro above it, putting the pieces on it.
Take the skewer and push them to the tip of the meat but don't break through.
Lay foil down the edge of the grill and then turn on the grill on a temperature of your choosing, the lower the more cooked it will be and the higher the faster the grill marks will appear. Take the foil and fold it to the length of the skewer.
Lay the wood part of the skewer over the foil with the meat on the grill.
Once they have the grill mark on both sides they are ready to go on a baking pan.
Place them apart from each other on the baking pan.
Place them in the oven and keep an eye on them. The salmon will take about a minute but the chicken will take 2-3 minutes. Cook according to what the eye thinks is good as most of the cooking was done on the grill.
Layer the Salmon skewers in the strawberry platter.
Place the Chicken skewers into a snack bowl in which the wooden ends stick outwards for easy grabbing.
Take a little flat leaf parsley to one of the the edges of the bowl and place where you feel it is right.
You can take a lemon twist and put it on top of this. Take a lemon and slice off a round piece that's thin. Cut about halfway in and twist it to make a lemon twist.
Take a little basil and set it at one of the ends.
For dip dish Take a martini glass and pour some Thai chili glaze in it.
Planning a romantic dinner date? Why not do it in your own backyard or perhaps in your own dining room? Now that's done and okay. What about your food? Have you chosen the perfect cooking recipes for your loved one? And don't buy takeout! That's cheating! Make sure that you prepared yourself that ambrosia! So, done with food, right? What about the nectar? Of course, do remember that you must match your ambrosia to a nectar. The Greek gods and goddesses wouldn't have lived without those combination. Make sure that your love must feel like a Greek god/goddess for this special evening. What about the table setting? Did you set out your special plate? The one you bought specifically for this night or those lovely pieces your grandmother bestowed upon you. Now that's all and done, what about your napkins? Why, of course, napkins are an essential part of a table setting!
Napkins to a table setting is compared as the perfect necklace to a woman's elegant gown. It makes the whole romantic dinner perfect. It's the accessory to it. But do make sure that when you do napkin folding, it won't outshine your own homemade gourmet meal.
The *most* common technique (and perhaps cliche and expected) in napkin folding for a romantic dinner is shaping them into hearts and flowers. Red as a color scheme is also not unusual for this sort of events. Nowadays, any color combination if properly executed can evoke romance – off white and beige, pink and magenta or even black and white. The table linen, centerpieces, china, flatware, glassware and other secondary elements to a meal should go together.
There are some extra efforts to be undertaken to successfully translate this concept into a romantic table setting and not look cheap. Using dainty vintage cotton or linen napkins (as long as they’re intact and not falling apart) rather than store bought polyester blends may in itself already evoke some element of class and romance especially if the theme is carried throughout the china, glassware and of course the food served.
Now that I have imparted my knowledge on you, I wish you luck on your romantic dinner date with your special someone. I wish that Eros and Aphrodite guide you in showing your love the best night of his/her life.
Healthy chicken recipes are really hard to find. There's always that unending question, "But wouldn't it be bland if I remove the chicken skin or if I only cook the chicken breasts?" If you don't play your cards right, then it will definitely bland and who would like to eat a dry, bland meal? I'm pretty sure you don't. But you don't necessarily need to sacrifice your diet just to have a very tasty meal. So, as a help, here is one of the cooking recipes that I came across that will definitely help our fellow brethren that are undergoing a diet but still want to satisfy and please their taste buds: Organic Spinach Stuffed Chicken Breasts.
One of the common problems in cooking chicken breasts is that it dries out easily, there is a high chance it will be bland as it consists white meat. But in this certain chicken recipe, we will solve that problem. By stuffing it with spinach, cheese, aromatic spices, this bland boring meal turns to a gourmet that both adult and children will love! To ensure that chicken breasts are moist and tender, moist and tender, rub it with an ample amount of healthy oil like olive oil. Are you ready to uncover this recipe? Ready your cooking skills and let's get cooking!
Ingredients:
2 pkg. (10 oz. each) frozen chopped organic spinach, thawed
1 cup shredded low-fat organic Swiss cheese
3/4 cup low-fat organic ricotta cheese
1/3 cup grated low-fat organic Parmesan cheese
1 clove organic garlic, minced
3 tbsp. organic white onion, finely chopped
1/2 tsp. course ground black pepper
1/4 tsp. ground nutmeg
6 boneless, organic skinless chicken breasts
2 tbsp. olive oil
1 tsp. paprika
1/2 tsp. organic dried thyme
1/2 tsp. organic dried oregano
Preparation Instructions:
Preheat oven to 350 degrees. Prepare a 15 X 10-inch baking pan by lightly greasing or spraying lightly with cooking spray.
Squeeze moisture from spinach. Put in a large bowl, along with the cheeses, garlic, onion, pepper and nutmeg. Stir to combine.
Cut a slit lengthwise through the center of each chicken breast to form a pocket. Stuff each chicken breast with the spinach mixture. Place chicken pieces in baking pan.
In a small bowl, combine oil and remaining spices. Brush mixture over chicken breasts.
Bake, uncovered, 1 hour to 1 hour 15 minutes, or until meat is cooked through.
Enjoy your originally bland chicken meal turned into a gourmet meal!
If you want to get the best
results out of your BBQ it is very important to take care of your grill. By
keeping your grill in good condition you are not only going to ensure that your cooking
recipes tastes better, but you are also going to extend the life of
your barbecue grate. We have already talked about choosing the best BBQ grill
brush for the job, but when is the best time to actually do the
cleaning? Well there are two schools of thought here, both with their pros
and cons. What they share in common is that they are both times when the
cooking grid is hot which makes the job much easier.
CLEANING BEFORE COOKING
Most people probably think that
the best time to clean is after those great recipes has been prepared, but there are some
great advantages to doing it beforehand too. Get the grill heated up first,
then give it a quick clean before you put any food on. The first advantage of
doing things this way is that food is going to be cooked on a totally clean
grate. Bits of crud can sometimes find their way in there if you have not
grilled for a while, and you don't want these messing up the flavor of your
dinner! Another advantage is that by by cleaning before, and leaving the grill
dirty afterwards, you are leaving a layer of burnt on food/grease on the bars
that will protect them from corrosion until you next get the BBQ out. This is
particularly important if you have cast iron grills, as they are the most prone
to rusting. One last advantage, and this is a big one for me, is simply that
you are getting the cleaning out the way as soon as possible; I can never be
bothered to get up and clean once I have a belly full of food!
CLEANING AFTER COOKING
The is perhaps the more
traditional way of doing things. The first advantage here is that the grill is
already going to be hot, and all the food and grease are fresh and therefore
easier to brush off. But as we said before, by cleaning after the meal, you are
leaving the cooking grill more exposed to the elements and at a higher risk of
rusting. This can issue can be worked around by ensuring you oil the grate once
you have finished cleaning as the oil will prevent any moisture corroding the
metal. Remember, this is especially important if your grate is cast iron.
Here comes the summer and with it comes the feeling of
heaviness on the body when heavy meals are eaten in this season.Chicken as a
light meat and pineapple as a juicy fruit are more appropriate in the summer
than heavy sauces and meats. Pineapple is rich in vitamin C and not only that
but also supplies the body with vitamin A, pantothenic acid and folate. With
its juiciness that is a good replenishment for the body to remain hydrated,
there is nothing like having pineapple in the hot summer months. While chicken
is rich in protein, it also provides the body with phosphorus, tryptophan,
vitamin B6, selenium,vitamin B3 and more. Though it can be prepared anytime you
want, Pineapple Chicken Salad
recipes are especially great in the summer. The sweet-tasting
pineapple gives a more delicious taste into the chicken salad you surely
wouldn’t want to miss when picking your favorites served on a buffet table. The
lemon juice, pepper, salt as well as the tomatoes make the salad more flavorful
which creates a perfect balance in your palate. This recipe is especially a
delight for the pineapple lovers, which can also be made as a filling for
sandwiches. Some prefer to munch on a pineapple chicken salad sandwich at
lunchtime. Chicken salad is not only great with sweet pineapple but also with
crunchy pecan, both are considered a perfect combination to make a delicious
pineapple chicken salad sandwich. One of the best easy recipes out there and is very popular in
casual gatherings especially when made as a filling in sandwiches. Great for
picnics, for any weekend getaway or just any day of the week, this recipe is
irresistible that everyone is just sure to love since it is not only light but
also healthful and perfect for those who are dieting as well.
Ingredients
4 chicken breasts cooked and chopped into bite size pieces
3 cups fresh chopped pineapple
24 oz. bag of fresh spring mix
2 cups of cherry tomatoes sliced in halves
Olive Oil
Lemon juice
Salt
Pepper
Basil (Dried)
1.After the chicken breasts are cooked, using a large bowl,
mix the pineapple, spring mix and chicken well.
2.Drizzle the salad with some amounts of lemon juice and
olive oil.
There is something incredible and comforting when you enter
your home and the smell of dinner recipes hit you. It is like a reminder of
a childhood moment when you entered the home from school and your mother was
cooking a delicious meal for you. After a long day of running errands and
attending meetings, appointments, car pools and workouts, this trip down memory
lane is highly soothing. Entering your home with such memories, home-cooked
meals and flavorful scents seems like a dream. However, with a slow cooker,
this no longer needs to be a dream, but rather reality.
Having a slow cooker at home is almost like having a
professional cook prepare all of your meals. This is because slow cooked meals
are extra moist and extra delicious perfect gourmet food for you and your family. All you have to
do to achieve such a delectable meal is just to set it into action in the
morning when you place all the ingredients in it. You can add some vegetables
with chicken or meat with a little broth to add just a bit of extra moisture.
These fulfilling ingredients are cooked all day long until the meat is tender
enough to melt in your mouth. You can grab a bite for yourself or wait until
the whole family arrives and enjoy the best cooked family dinner ever, minus
the effort!
Slow cooked meals are very economical as well. How so? Well,
first of all for meals cooked in this device you don't have to buy special cuts
of meat that require less time to cook. These cuts are more costly than the
low-cuts. So, while cooking in a slow cooker, regardless of how hard the meat
is, it will always be cooked at the right time and will also be soft and moist
just like it should be. Secondly, the thought of going home and preparing a
meal is something we all dislike and to avoid it we normally go for fast food
options. But when you know that a meal will be ready for you when you get home,
you won't feel the need to spend money eating out. Hence, it definitely saves
you a lot on food expenses.
Meals cooked in a slow cooker are also very healthy since
the natural nutrients and ingredients are preserved in the dish. Now you can
enjoy a hearty meal with your family without shedding a drop of sweat.
As the temperature drops and the leaves begin to fall, it's
natural to gravitate to heart-warming meals. Soups are a delicious and easy way
to load up on good-for-you ingredients, and a great way to keep on top of your
weekly meal planning. They can be made ahead of time and frozen in batches, to
be part of both lunch and dinner for your busy family. Plus, they're good for
you and can keep everyone in your family protected during cold season.
Next time you're in a warm kitchen on a brisk fall
afternoon, try out one of these quick soup
recipes. From beans to veggies, each food recipe offers something for everyone. They'll
warm you up, keep you energized and make even the pickiest eaters around the
dinner table happy.
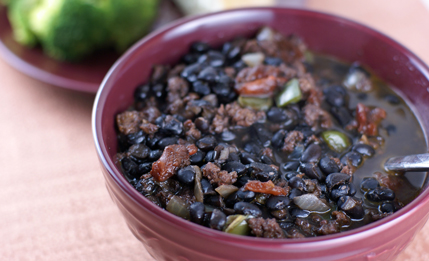
1. Black Bean Chorizo
Soup
While it can certainly be adapted for the vegetarians in
your house, using chorizo and bacon as a base in this savory soup recipe will
add a distinctive layer of flavor that's complemented by the bold flavors of
Bouillon stock, peppers, onions and garlic. Top it off with some shredded
cheddar, sour cream or avocado slices (or maybe even all three!), and serve
with a side of tortilla chips for extra crunch.
Prep time: 15
minutes
Cooking time: 30
minutes
2. Vegetable Medley
Soup
The cold weather is here and what better way to warm up than
with a soup recipe. Asparagus, mushrooms and onions are the base for this
particular recipe, but you can always throw in other veggies, such as potatoes,
carrots and celery, to suit your taste. Best of all, the entire dish comes
together in 30 minutes max, so it's the perfect weeknight staple.
Prep time: 10
minutes
Cooking time: 20
minutes
3. French Onion Soup
Nothing says "fall" like a steaming bowl of French
Onion Soup. Perfectly matched with some French bread and freshly ground black
pepper, this easy soup is a surefire crowd pleaser as either an entree or a
starter.
Prep time: 10
minutes
Cooking time: 30
minutes
4. Hearty Minestrone
Soup with Tortellini
An old standby, this flavorful soup should be an autumn
essential to your kitchen table rotation. A mix of stock, beans and vegetables
fills you up and keeps you going through even the busiest weeks of work, school
and family obligations. Whatever is left over will freeze beautifully; or you
can make a batch on Sunday and enjoy for lunch or dinner throughout the week.
Prep time: 15
minutes
Cooking time: 30
minutes
These recipes for easy, delicious soups can help you fill
your kitchen with warmth. Providing hearty meals for the entire family brings
everyone together in an instant. Get creative and pair any of these soups with
some of your favorite sides and salads, or serve as a starter. You couldn't ask
for a quicker way to a balanced and flavorful meal.
We know that eating healthy food is good for us, but why is it
that we don't eat right the majority of the time? What has become so important
that we can't seem to manage to eat a balanced meal? Perhaps maybe we are just
asking too much; perhaps we should start with something a little easier like
juicing. The Juicer Health Benefits that can be achieved are those that our
bodies need on a daily basis.
Learning the Juicer
Health Benefits
Most of us know that oranges contain Vitamin C and bananas
are full of potassium. Spinach provides a ton of antioxidants and is a great
anti-inflammatory. Bell peppers provide a wealth of benefits that are good for
the heart; benefits such as necessary folic acid and lycopene. Did you know
that brussle sprouts contain Vitamin B, C and K along with fiber, omega-3 and
potassium? Then it ain't bad to add it to your quick
recipes.
Juicing not only provides nutrition to our bodies, but it
also educates our minds. We have to know what certain foods contain before we
juice them. We need to know why we are going to juice them. Juicing is more
than a tasty drink, it is a way of life.
Juicers are simple to use so creating a serving of juice is
an easy process. It's knowing which foods to juice in order to obtain the
maximum benefits possible combined with a great taste. If you are unsure where
to start, there are numerous recipes on the Internet today that offer the
Juicer Health Benefits that you are after.
Implementing Your
Healthy Knowledge
Now that you have learned about a variety of fruits and
veges, it's time to use your juicer. The process to prepare your juicer should
be pretty straight forward. The next step is to prepare your produce. It is
best to remove seeds, peels and rinds prior to juicing. For some fruits, such
as grapefruit and oranges, you may want to remove the white pith that is found
on the fruit when peeled. If the chute on your juicer is not a "wide
mouth" one, you will want to cut/slice your produce so that it each piece
will fit without any unnecessary force.
Which recipe will you be making to obtain the Juicer Health
Benefits that you have been learning about? Is it strictly vegetables or a
combination of fruits and vegetables? Whichever one you have chosen, I am sure
that you will enjoy the final results.
Continuing Your
Education
If you have any questions regarding your health and juicing,
you should consult with your doctor. Do not rely solely on juicing to obtain
your daily nutrition requirements. Juicing can be used to assist with your
dietary needs. Juicing can be a refreshing summer drink or a quick pick-me-up
after a workout.
One of added benefits to juicing is the pulp that is
extracted. The pulp can be used in a variety of other recipes like muffins,
casseroles or even soups. You can increase your overall health by maximizing
the Juicer Health Benefits you learn and incorporate them into daily diet which
will benefit you and the rest of your life.
Possessing bean to cup coffee machines, you can expect to
get an enhanced coffee drinking which would let you feel more
refreshed. The demand of commercial coffee makers is increasing rapidly. Bean
to cup coffee machines are the part of this range and people appreciate them
for offering an excellent drink that too with easy operation. Making complete
justification to their name, they are acclaimed for producing fresh coffee
directly from the beans. There are two variations including fresh and powdered
milk. Top quality taste is a promise which can be expected from these machines.
There is no doubt that these machines are called an
automated barista and integrated with the modern features. Most of the machines
come with incorporated internal grinders and fresh coffee is grounded for each
drink. Furnished with tamping and dosing, these coffee makers conduct
self-calibrating for producing best tasted espresso while preparing your breakfast recipes or meals. You can sip different
drinks as these can produce latte, macchiato and cappuccino. Besides these
features, bean to cup coffee makers must have some essential features like:
Importance of Wattage:
This lets you know that how quickly your coffee maker can
boil the water and how much time, it would take to generate a delicious cup of
coffee.
Utility of Hoppers:
The hopper is defined as a part that play a vital role in
holding the beans. As per the size of the machines, these come in multiple
sizes. If we talk about high end machines so you might need a second hopper to
blend more beans.
Value of Bar Pressure:
There can be around fifteen bar pressure, the higher would
be the pressure the more mouth-watering coffee flavor you can expect.
Types of Coffee Drink:
Some coffee machines would offer you only espresso drinks
but there are many that can also provide you other flavors as well.
Benefits of Bean to Cup Coffee Machines
High convenience level: With the help of bean to cup coffee
machine, you can surely get rid of the messy traditional coffee makers. The
bean to cup coffee maker is appreciated for having automated functionality
which helps you to get a cup of coffee quickly.
Superior quality: To ensure the best quality, you
should select bean to cup coffee maker from a recognised brand. A good machine
ensures the correct amount of coffee beans that need to be grounded and brewed.
Time-Efficiency: These are many reliable brands such as
Jura that come integrated with the facility of cleaning, rinsing, descaling and
power saving.
Price Consideration: It is true that these coffee
machines promise diverse functionalities but you must not get pre-occupied with
the thought that they would have a heavy price tag. As per your budget and
requirement, you can purchase a suitable coffee maker from this array.
Ganache comes from an old French word meaning pillow. And
effectively that's what a ganache is, a little pillow of delicately blended chocolate and cream.
The mixture is traditionally made by blending chocolate, cream and sometimes
butter together. But modern chocolatiers have taken to making in with different
ingredients and methods as we'll discover. Depending on how it is made it can
be used to fill chocolates, cakes, macarons, to make truffles and as a glaze
for cakes and dessert recipes.
The age old method for making a ganache is to heat cream
until it is just at boiling point then pour it over chopped chocolate or
callets (chocolate buttons used by professional chefs & chocolatiers). The
cream is left to sit on top of the chocolate for 30 seconds or so, before the
chef slowly stirs from the centre incorporating the cream with the melted
chocolate. What is happening here is that the cream and chocolate are forming
an emulsion. Some chefs prefer to incorporate cream at around 45c to already
melted chocolate at the same temperature. In any event the aim is to achieve a
fully emulsified, silky smooth result. This can be helped by using a hand
blender immersed into the liquid mix- Note it must be kept below the surface,
as air should not be introduced into the ganache mixture. Once fully blended
butter may be added to increase the richness, but also the firmness of the
final ganache.
If using for truffles, ganache is ideally left at room
temperature for 4hrs before refrigerating until the desired working texture is
achieved.
Ratio wise, for truffles and fillings a 2 parts chocolate to
1 part cream formula is generally used. For coating cakes the cream element may
be increased slightly and sometimes sugar syrup is blended in for glossier
results. Other variations will include the addition of fruit purée, flavoured
oils, nut pastes, alcohol, or infusing herbs and spices into the cream from the
outset.
The traditional method outlined above is used by most
people. However for those seeking even greater flavour heights there lies one
problem with the traditional method of making ganache and that is that cream
and butter mask flavours. Just think about how you dull down the spices in a
curry if it's too hot - by adding cream or yoghurt. The same things happens
when you add it to chocolate, it dulls all those beautiful top and bottom notes
that make up a great chocolate, along with whatever flavours you have chosen to
add. So some chocolatiers and chefs have started to make ganaches without the
use of cream, using what many refer to as the water ganache method, where
water, a flavoured liquid or fruit purée is used instead of cream. This
presents a number of problems, but when solved properly can deliver exceptional
length, depth and clarity of flavour.